CONNECT
Animation has evolved from traditional 2D techniques to the sophisticated world of 3D animation. Initially, 2D animation was done by manually drawing each frame, as seen in Disney classics. Over time, digital tools made the process easier, making 2D animation more efficient and detailed.
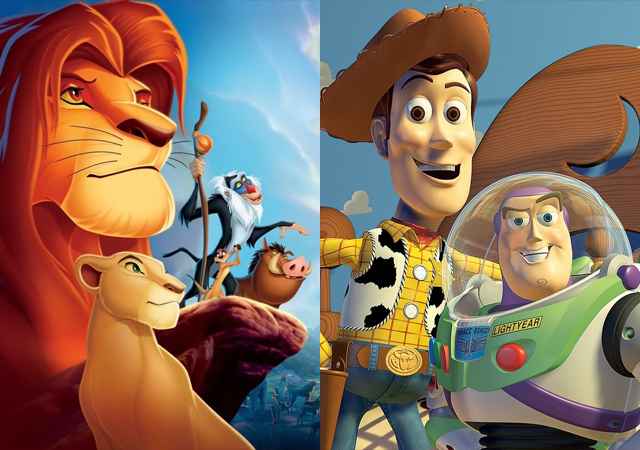
The transition to 3D animation began with “Toy Story” (1995), the first feature film entirely in 3D. 3D animation uses computer modeling to create three-dimensional characters and settings, providing more depth and realism. Technological advances in physics simulation, light rendering, and motion capture have enabled more realistic films, like “Avatar” and “Frozen.”
In addition to movies, 3D animation has also impacted TV series and streaming, offering high visual and narrative quality.
CONTEMPLATE
DO YOU KNOW WHAT PROGRAMMING LANGUAGE IS?
A programming language is a set of commands that allows people to communicate with computers, indicating what needs to be done and how it should be executed.
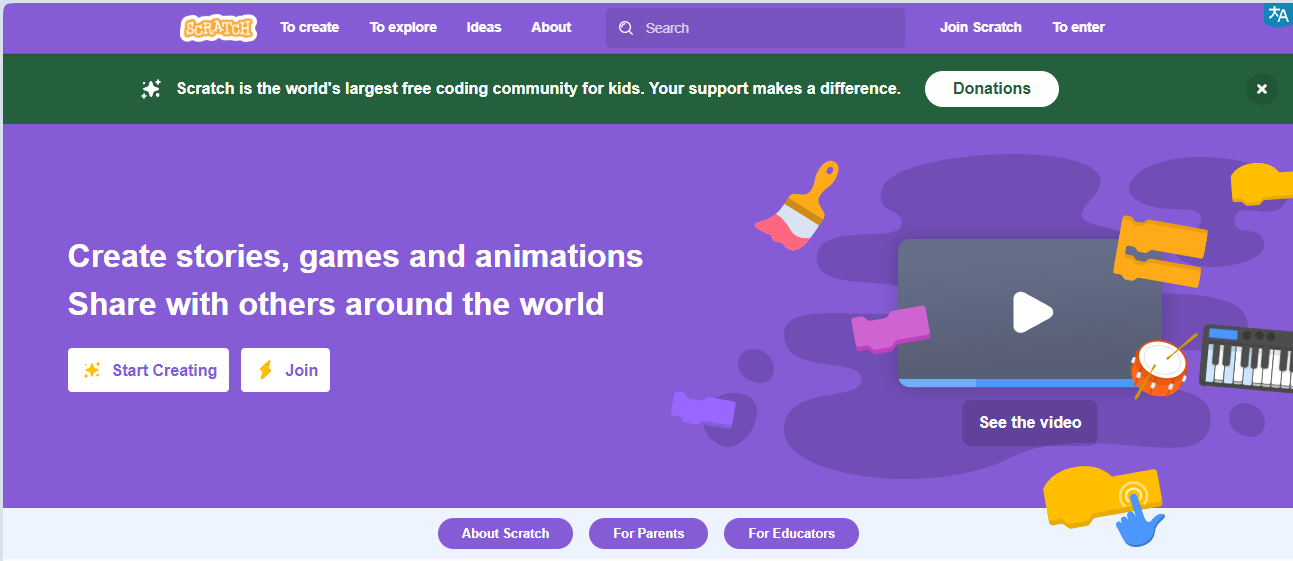
Scratch is a visual programming language developed by MIT, which offers an accessible and fun way to learn programming. Instead of typing lines of code, users drag and drop colorful blocks in an intuitive graphical interface. It can be accessed through the website: https://scratch.mit.edu/
Learning programming with Scratch is easy, as it uses a graphical interface with blocks that fit together like LEGO pieces.
Watch the video and see some project examples:
WHAT CAN BE CREATED USING SCRATCH?

With Scratch, you can create a variety of projects, such as interactive stories, games, animations, educational projects, and interactive applications.
The platform offers a wide range of creative possibilities for users to explore.
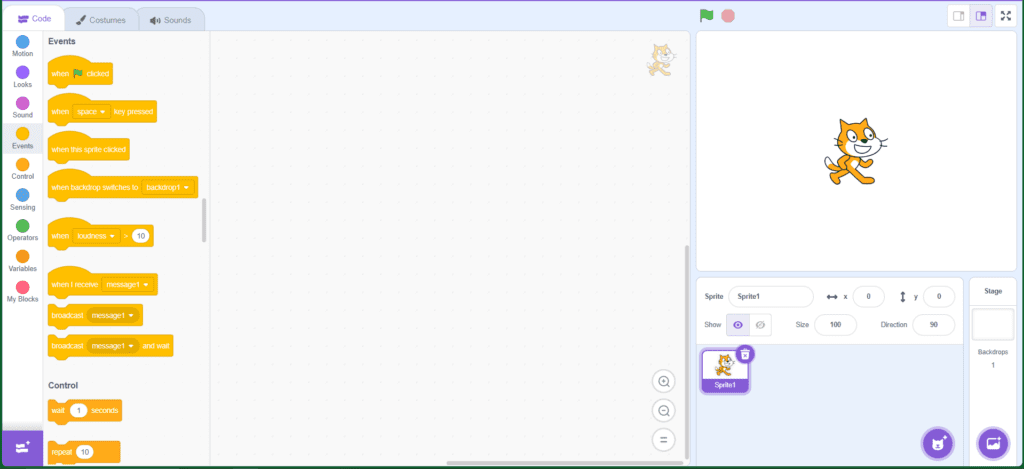
GETTING TO KNOW THE PROGRAM INTERFACE
The program interface is very intuitive and easy to use.
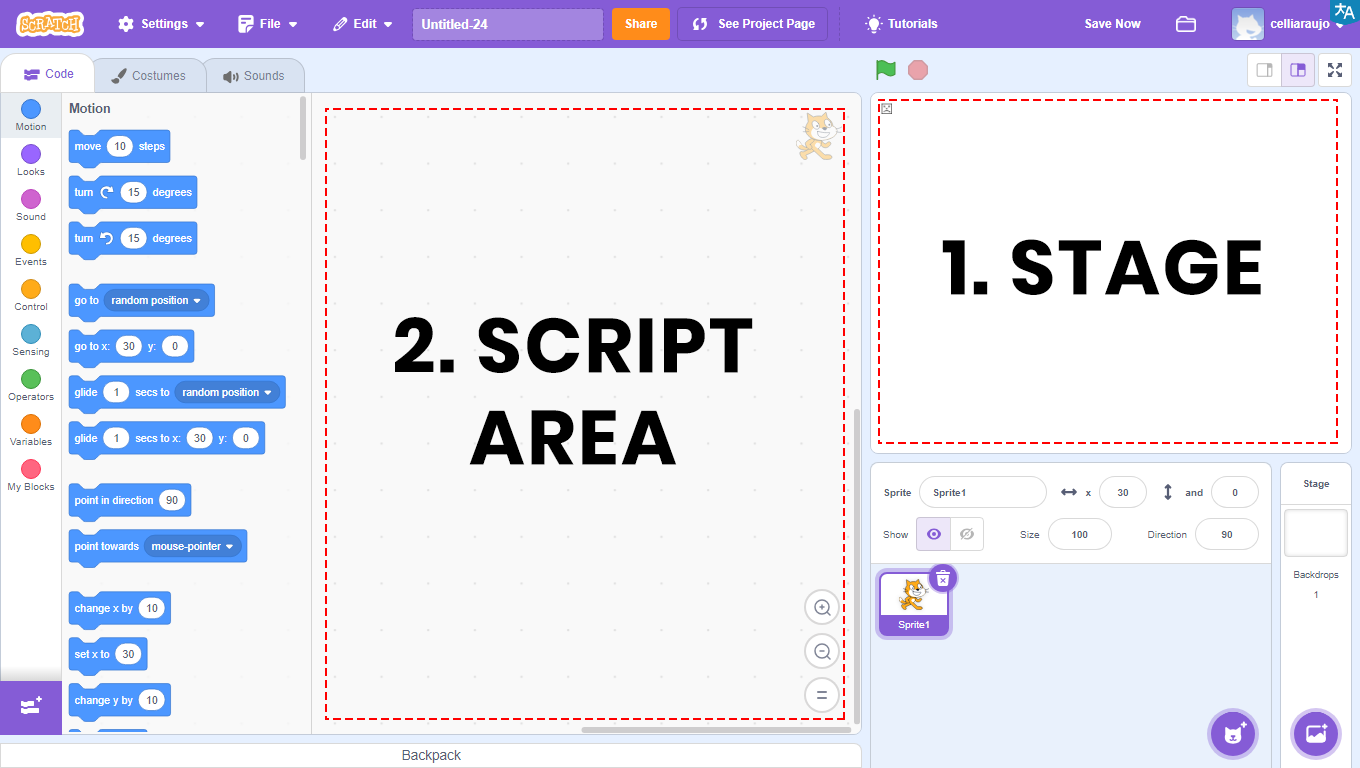
1 – Stage: the area that allows the visualization of all the graphical and animated parts of the project, and where tests will be performed.
2 – Scripts Area: the area where programming will take place. This is where the codes will be developed and the blocks will be dragged.
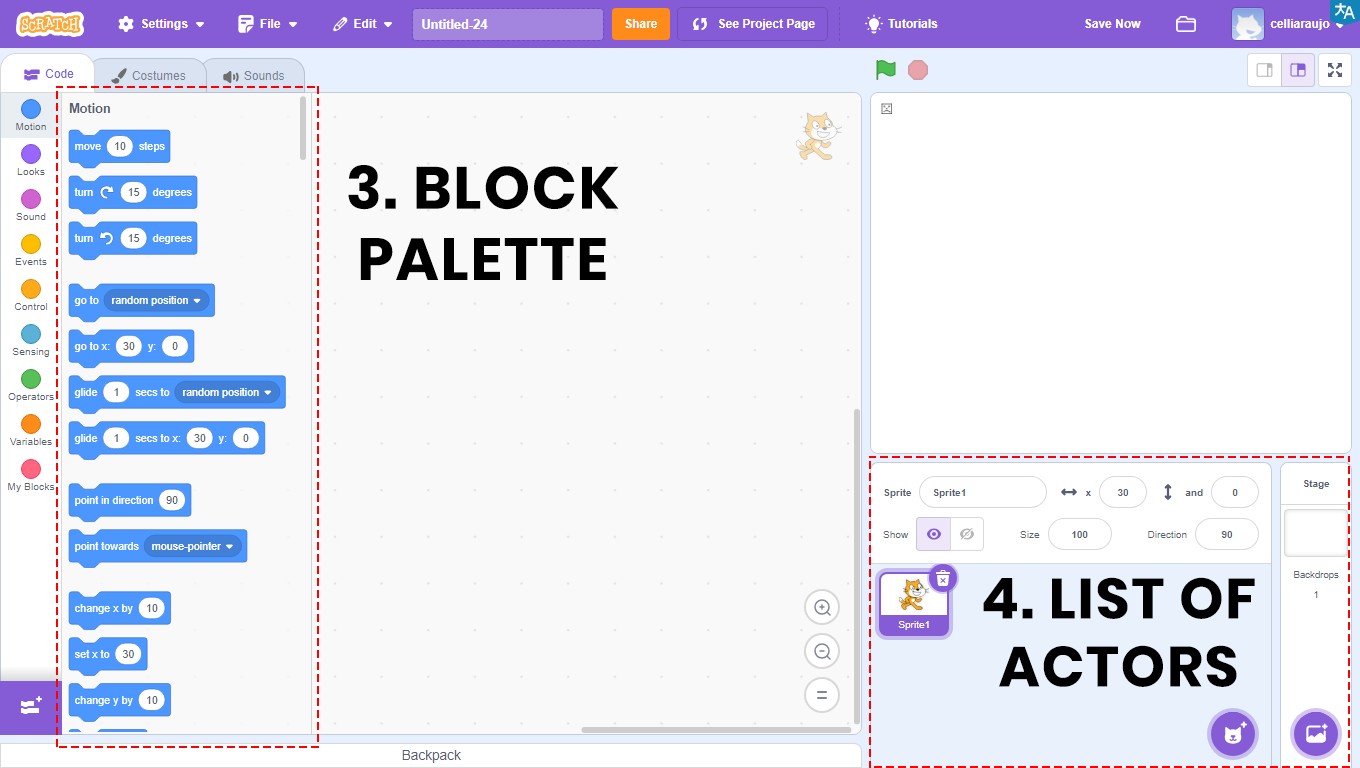

3 – Block Palette: all the blocks used will be in this area. They are color-coded, and within each color, the blocks have different shapes. Each color is responsible for a function, and depending on the shape, the block returns or reads a type of value.
In the Scripts Area will be the blocks that will be compiled, that is, transformed into a program, which will be visualized through the Stage.
4 – Actors List: the area that allows the visualization, insertion, and alteration of images that will appear on the Stage. Also known as Actors.
BUILD
ACTIVITY PROPOSAL
WALKING ON THE LINE
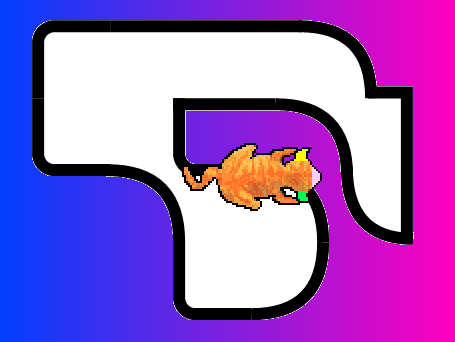
Access the Scratch website at https://scratch.mit.edu/ and animate a cat that will follow a black line drawn on the screen. To embark on this journey, the user will make a bat fly through a dark forest. Follow the step-by-step instructions and, when finished, click the green flag and watch the animation you developed.
GETTING TO KNOW SOME PROGRAM FEATURES
1. To rename actors, click in the field next to the text “Actor”.
2. To adjust the position of actors on the stage, enter numbers in the x and y coordinate fields.
3. To make the actor visible or invisible, click on the “Show” icons.
4. To change the size of the actor, adjust the number in the “Size” field.
5. To change the direction of the actor, adjust the number in the “Direction” field.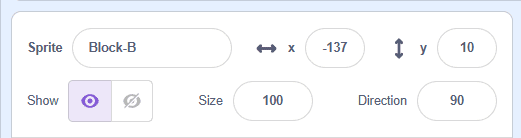
PROGRAMMING THE PROJECT
1. Click on the Cat Actor and then on the trash can icon to delete it.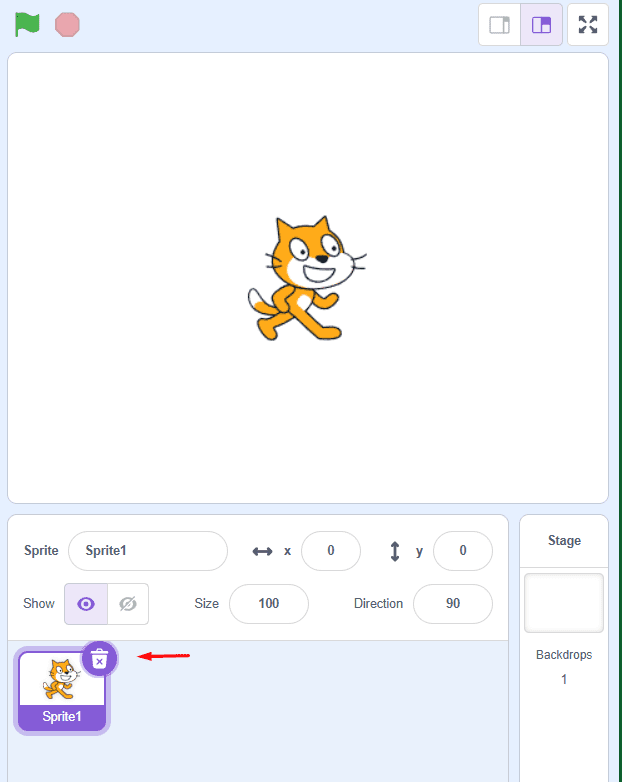
2. Before starting, download the images of the Actor and background (scene). (Click here)
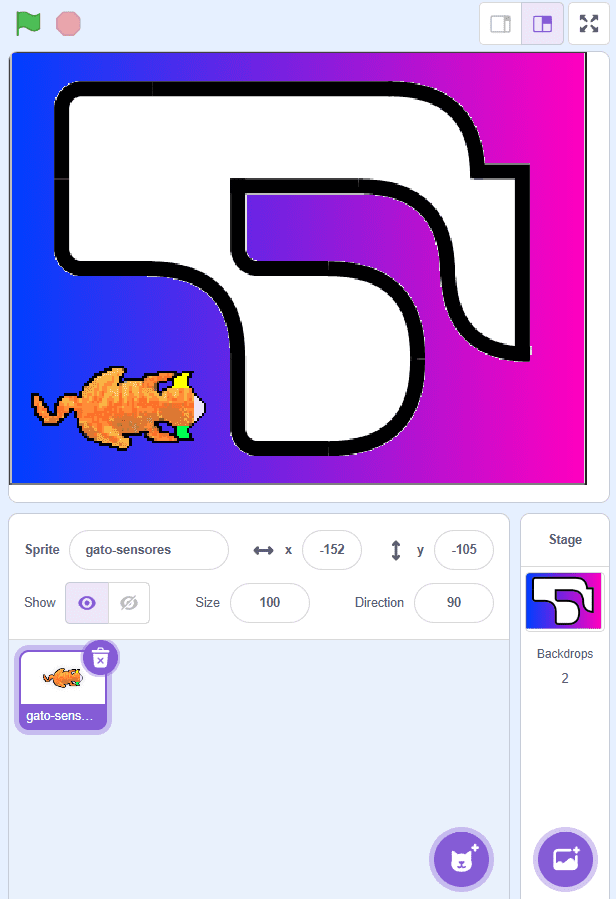
3. To insert the actor (sensor cat) and the background (line background), follow the instructions below:
- To insert an actor into the Scratch program, click on the link above, download the image, and then go to the actor tab, click on “Upload Actor”, browse for the image, and insert it into the lesson.
- To insert a background, repeat the same process in the background tab, click on “Upload Background”, browse for the image, and insert it into the lesson. Click on the blank background and then on the trash can icon to delete it.
![]()
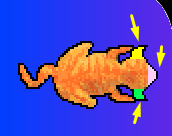
Notice that the character has the left ear painted yellow, the center of the nose painted pink, and the right ear painted green. This is because the cat’s nose and ears will be used as color sensors to detect the black line that will be on the Stage.
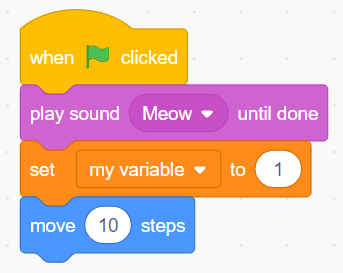
4. Select the Sensor Cat Actor, go to Events, drag the block “when ![]() clicked” (purple arrow) to the Script Area.
clicked” (purple arrow) to the Script Area.

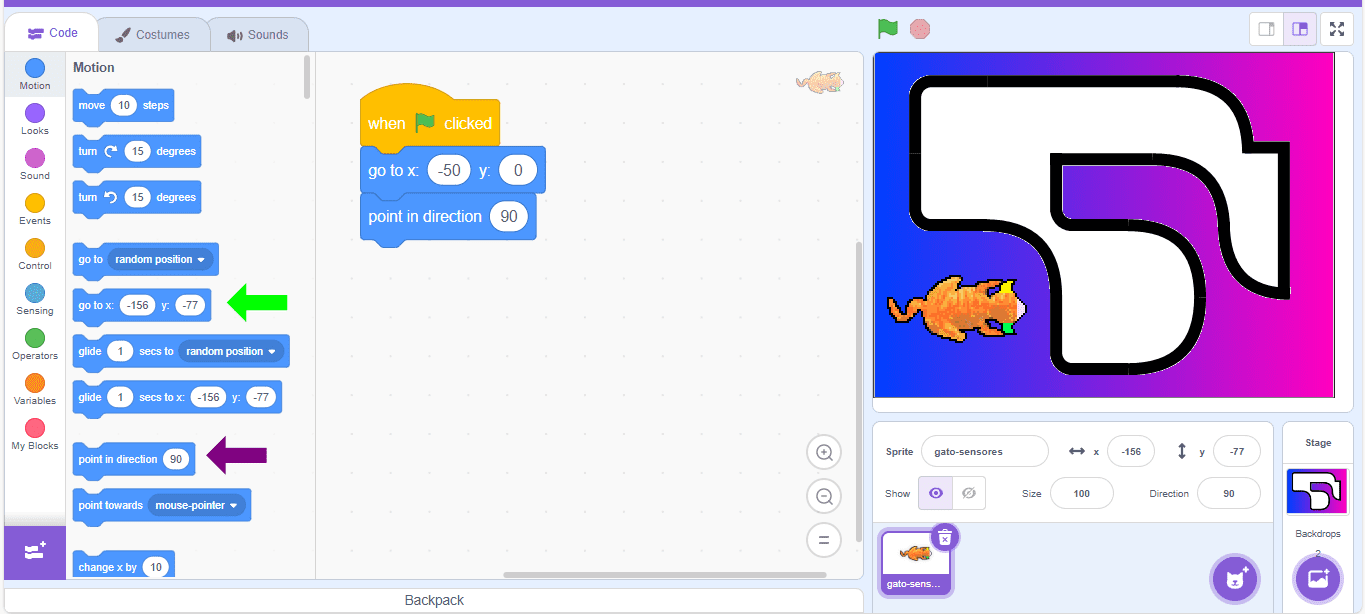
5. To position the Actor on the screen, go to Motion, drag the block “go to x:0 y:0” (green arrow). Change the value in the white box for x to: -50 and the value for y to: 0.
6. Still in Motion, drag the block “point in direction 90” to the Script Area (purple arrow).
7. Click on Control and drag the block “forever” to the Script Area (green arrow).
This lesson will use conditional commands such as: (if, then, else).
• IF (condition).
• THEN (what the program should do).
• ELSE (if the condition is not met, what the program should do).
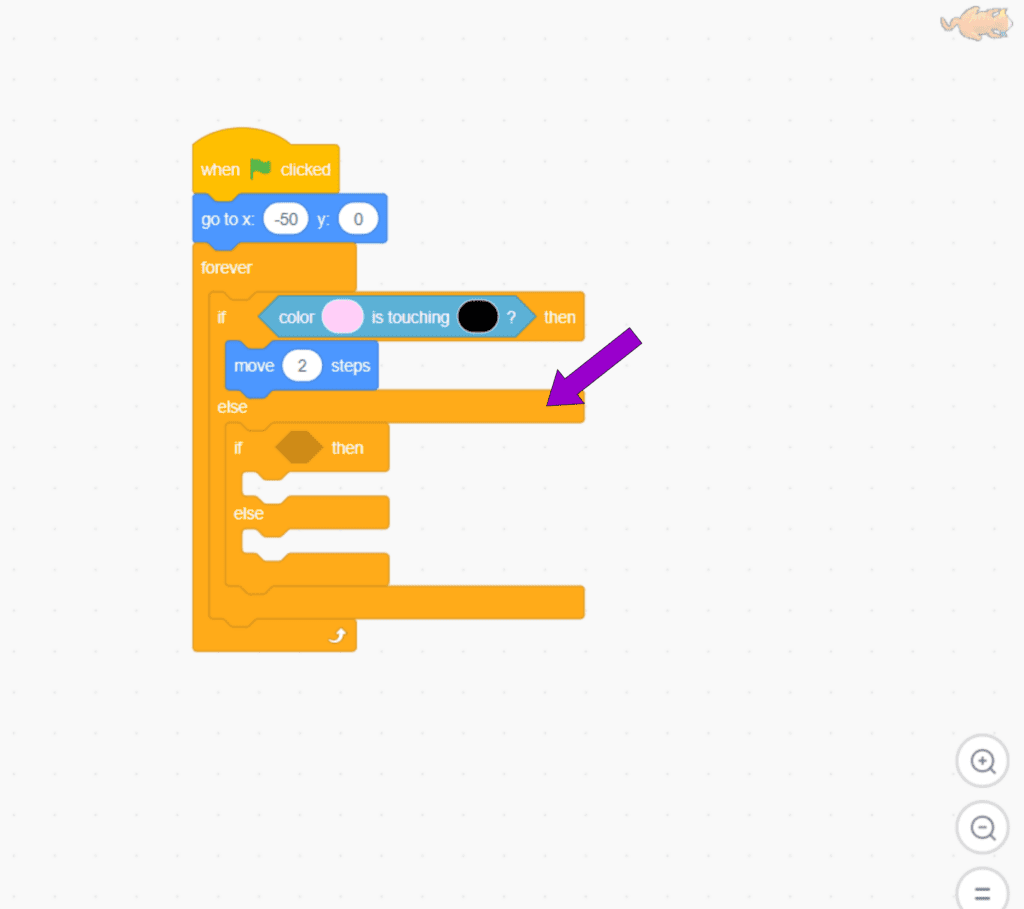
8. Next, drag the block “if…then…else” to the script area (purple arrow).

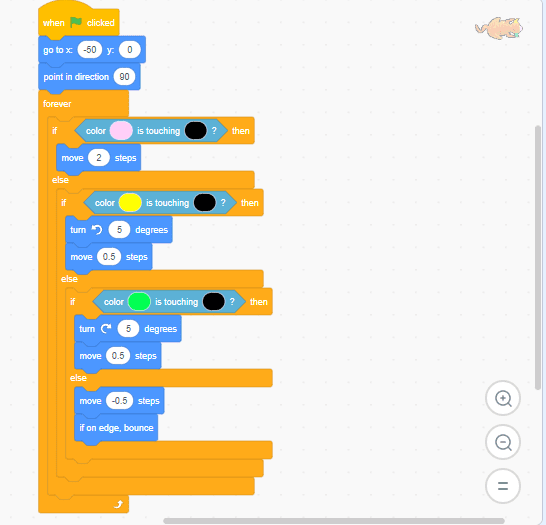
The cat will have the following programming:
• If the cat’s nose (pink color) touches the line (black color), it will move forward.
• If the left ear of the cat (yellow color) touches the line (black color), it will rotate counterclockwise and move forward at reduced speed.
• If the right ear of the cat (green color) touches the line (black color), it will rotate clockwise and move forward at reduced speed.
To make these conditions happen, sensor blocks with the indicated colors will be used.
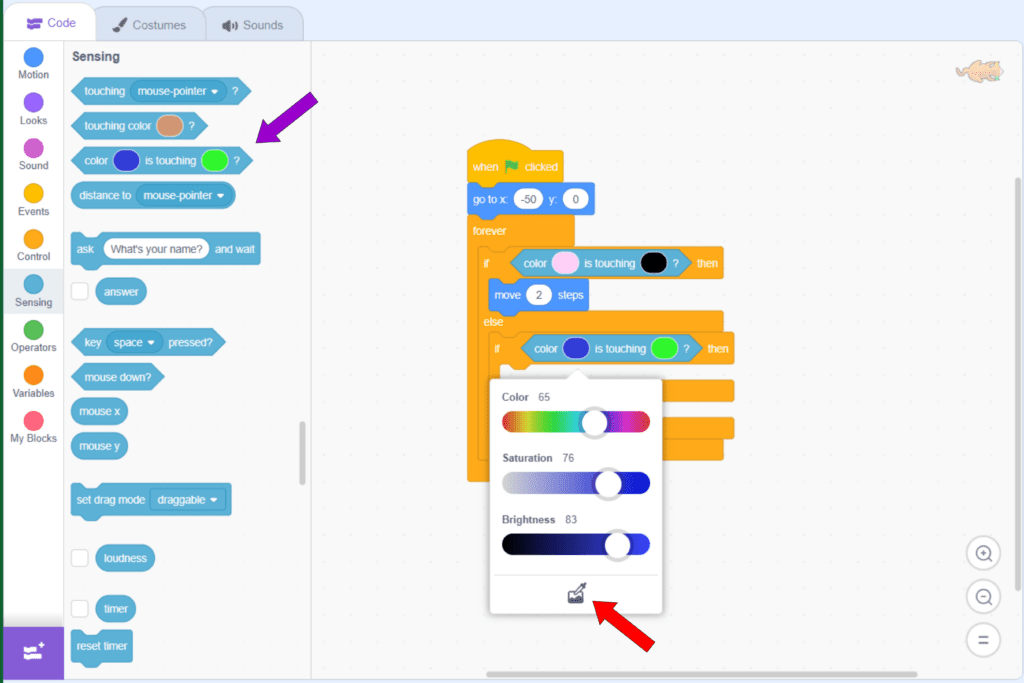
9. Go to the Sensors tab and drag the block “is color … touching color …?” into the conditional command “if…then” (purple arrow).
10. To define the color, click on the space with a color, select the dropper option (red arrow), and choose pink color in the first box and black color in the second box.
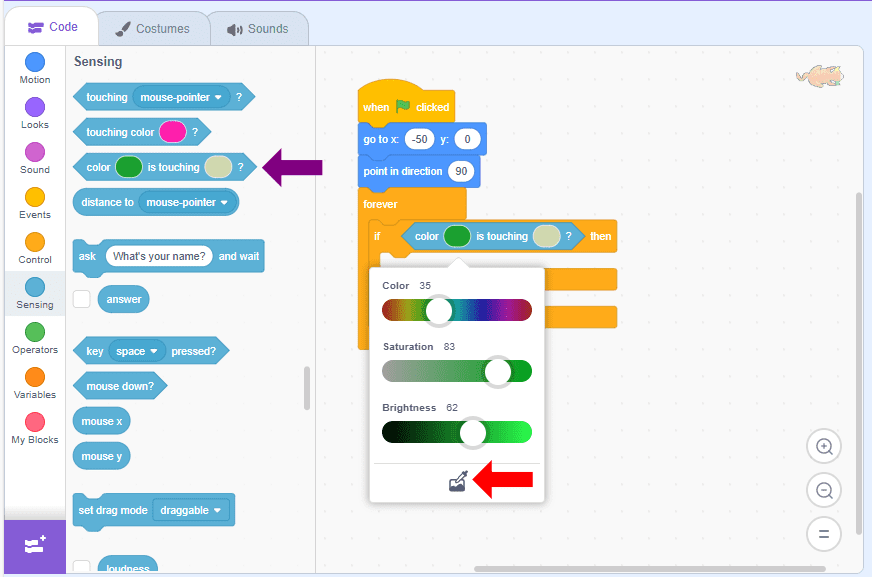
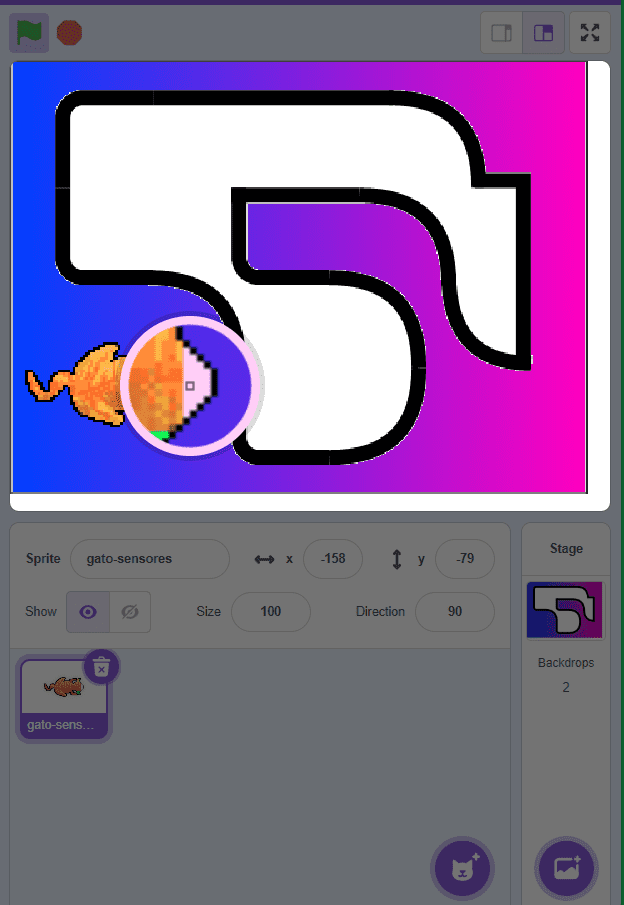
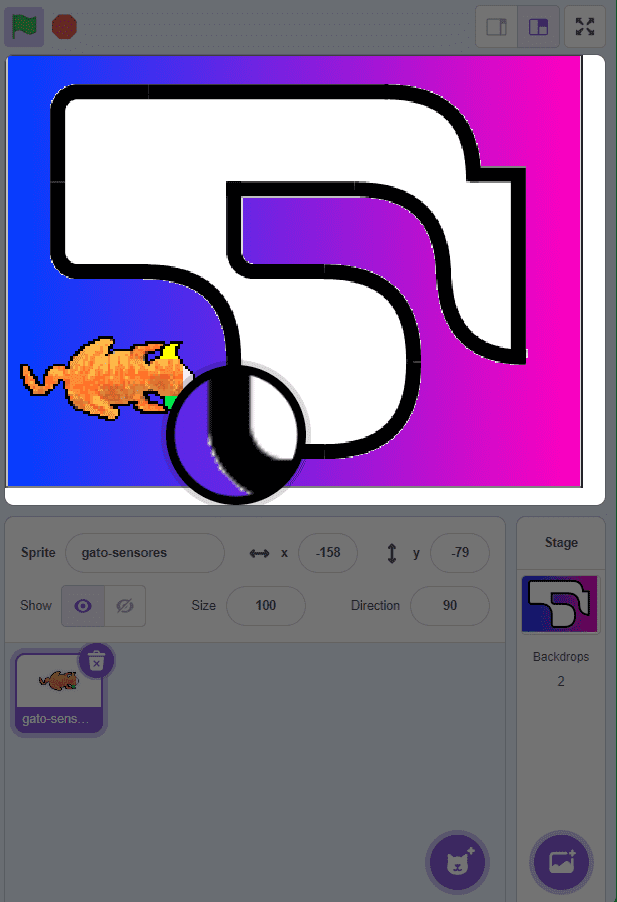
To select the colors correctly, when clicking on the dropper, move the cursor in the direction where it is located on the actor, as shown below:
The images below show how to select the colors of the Actor’s nose (pink) and the scene line (black). This will also apply to the ears in the following commands. Move the mouse to the desired area to show the color that will be selected.
11. Go to Motion, drag the block “move 10 steps” into the conditional command field “if…then” and change the value in the white box to “2”.
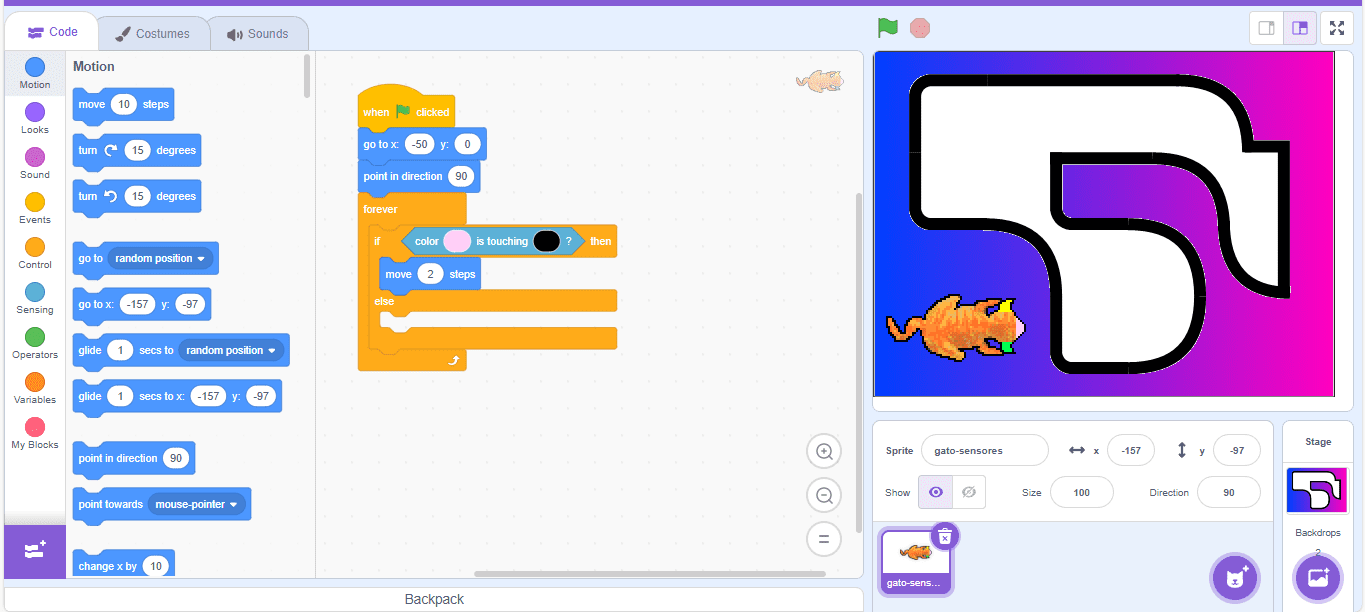
12. Click on Control and drag the block “if…then…else” (purple arrow) to the script area and insert the second conditional command block in the “else” space.
13. Go to the Sensors tab and drag the block “is color … touching color …?” into the conditional command “if…then” (purple arrow). Click on the space to define the color, select the dropper option (red arrow), and choose yellow color from the left ear of the cat and black color from the line.
14. Go to Motion, drag the blocks “turn 15 degrees”, change the value in the white box to “5” and “move 10 steps” change the value in the white box to “0.5” into the conditional command field “if…then”.
15. Click on Control and drag the third conditional command block “if…then…else” (purple arrow) to the script area and insert it into the conditional command block in the “else” space.
16. Go to the Sensors tab again and drag the block “is color … touching color …?” into the conditional command field “if…then”.
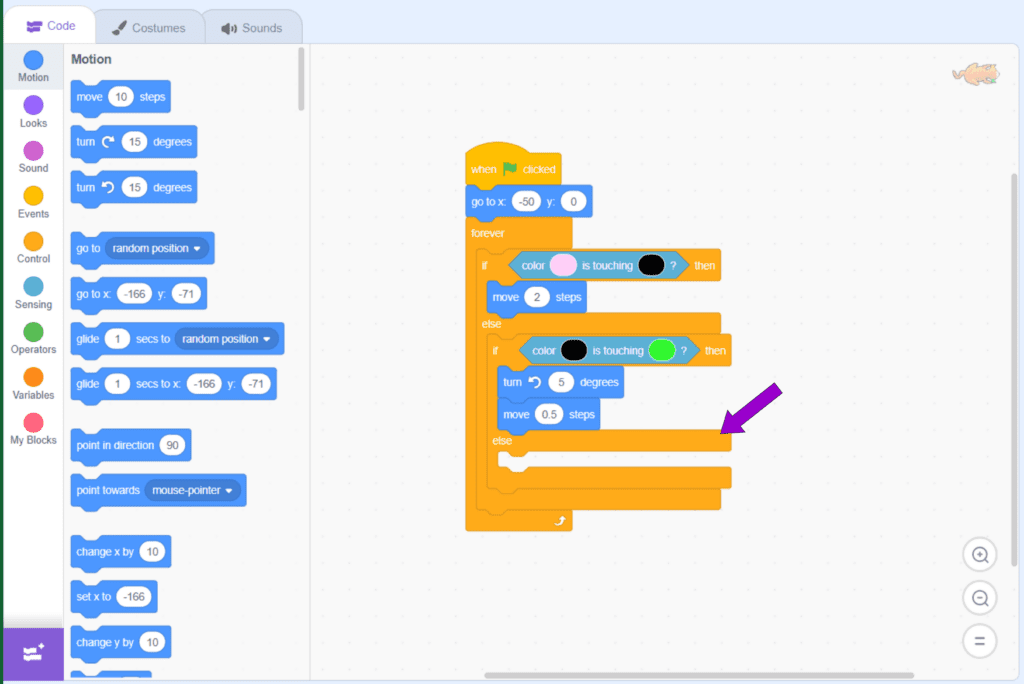
17. Click on the space to define the color, click on the dropper option. Select the green color of the cat’s right ear and black color of the line.
18. Go to Motion, drag the blocks “turn 15 degrees”, change the value in the white box to “5” and “move 10 steps” change the value in the white box to “0.5” into the conditional command field “if…then”.
19. To complete the conditional command blocks, go to Motion, drag the blocks “move 10 steps”, change to “0.5” and the block “if on edge, bounce” and fit them into the third conditional command block in the space “else”.
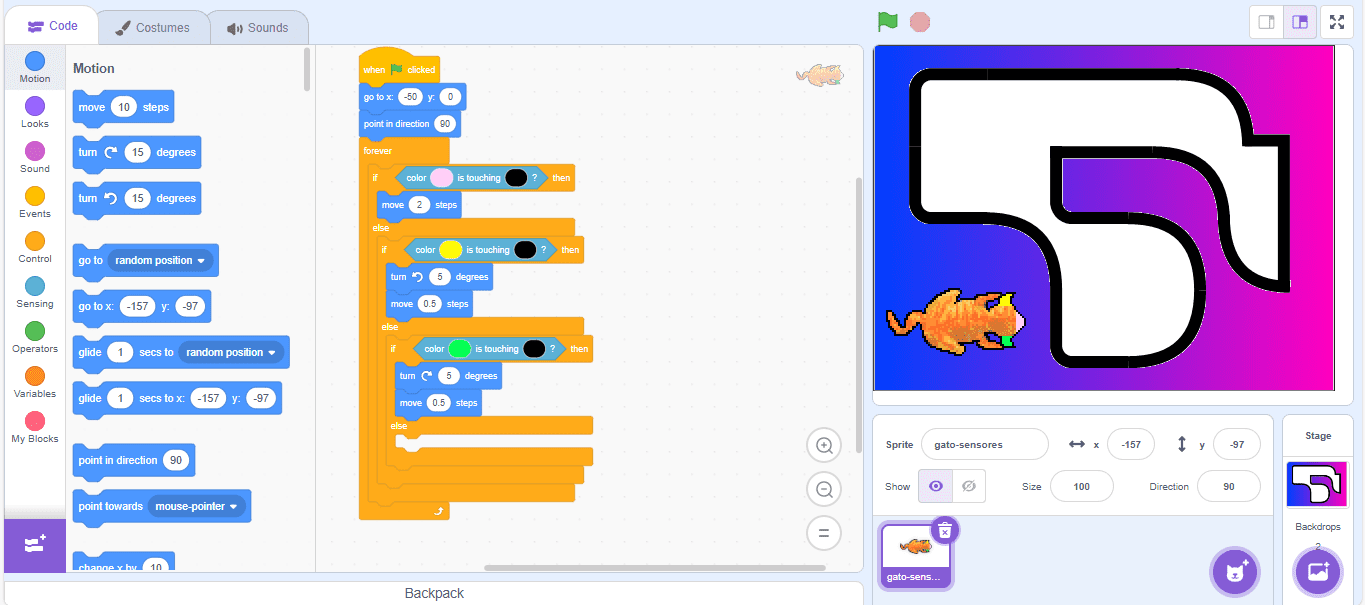
21. Finally, see how the animation turned out. Click on ![]() .
.
CONTINUE

After creating the game, share the experience with the class.
- What was your biggest challenge in this programming?
- What would you add to the programming?
- Did you manage to program correctly for your cat to move and change color?