CONNECT
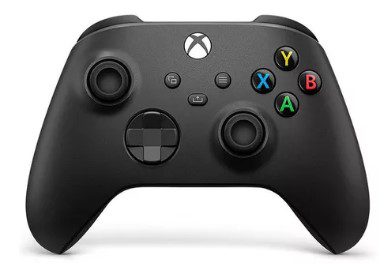 A joystick is an input device primarily used to control computer games and simulators. It consists of a lever that can be moved in various directions and buttons that can be pressed to execute different commands. The functions and uses of a joystick include:
Motion control: The joystick lever allows the user to control the direction and speed of movement of a character or vehicle within a game.
Game actions: The buttons on the joystick can be configured to perform a variety of actions, such as jumping, shooting, opening doors, and much more, depending on the game.
Flight simulators: In flight simulators, joysticks are used to control the plane, including movements such as ascending, descending, turning left or right.
Driving simulators: In driving simulators, a joystick can be used to control the direction and acceleration of a vehicle.
Accessibility: Joysticks are also used as accessibility devices for people with disabilities, allowing easier control of computers and other electronic devices.
Drone control: Some joysticks are used to control drones, allowing precise movements and complex maneuvers.
In addition to games, joysticks are also used in various professional applications, such as in robotics, to control robotic arms and other specialized equipment.
CONTEMPLATE
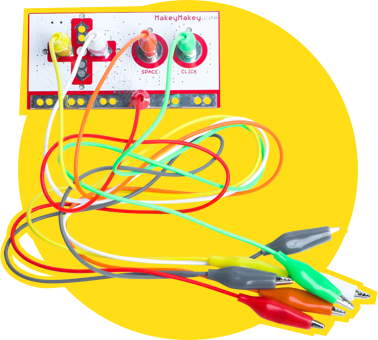
The circuit board is part of a creative interaction kit.
This board allows the transformation of common objects into “commands,” meaning they become touchpads*. These objects send information to the computer in the same way as input devices like the keyboard and mouse. With it, we can create various projects, even a banana piano or a modeling clay video game controller.
*Touchpad: sensitive device that executes a command when touched.
For the circuit board to work, conductive materials are required. These are materials that conduct energy, such as metals (copper, gold, silver, and aluminum), seawater, and our bodies. However, there are also materials that do not conduct energy, such as rubber, styrofoam, glass, pure water, and oil, which cannot be used to make the circuit board work.
As we have seen, the board makes projects more fun by transforming any object that conducts energy into a real keyboard.
Discover some of these objects:
• Fruits and vegetables: bananas, apples, lemons, or carrots can be used as keys or buttons.
• Aluminum foil sheets: small pieces of aluminum foil connected to the board’s pins can be touched or pressed to send signals.
• Pencils: can be used to draw circuits or directly connect objects to the board’s pins.
• Water: is a conductor of electricity, so it is possible to use containers of water as part of the circuit. For example, by dipping your fingers in cups of water and touching conductive objects, signals are sent to the computer.
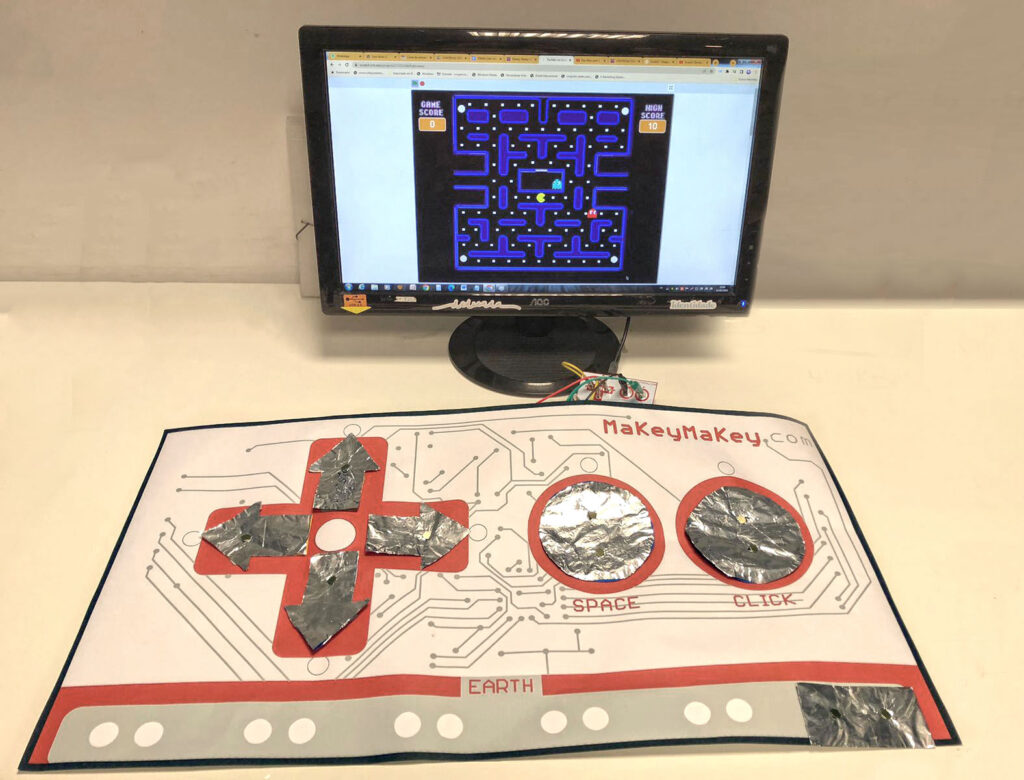
GETTING TO KNOW THE BOARD
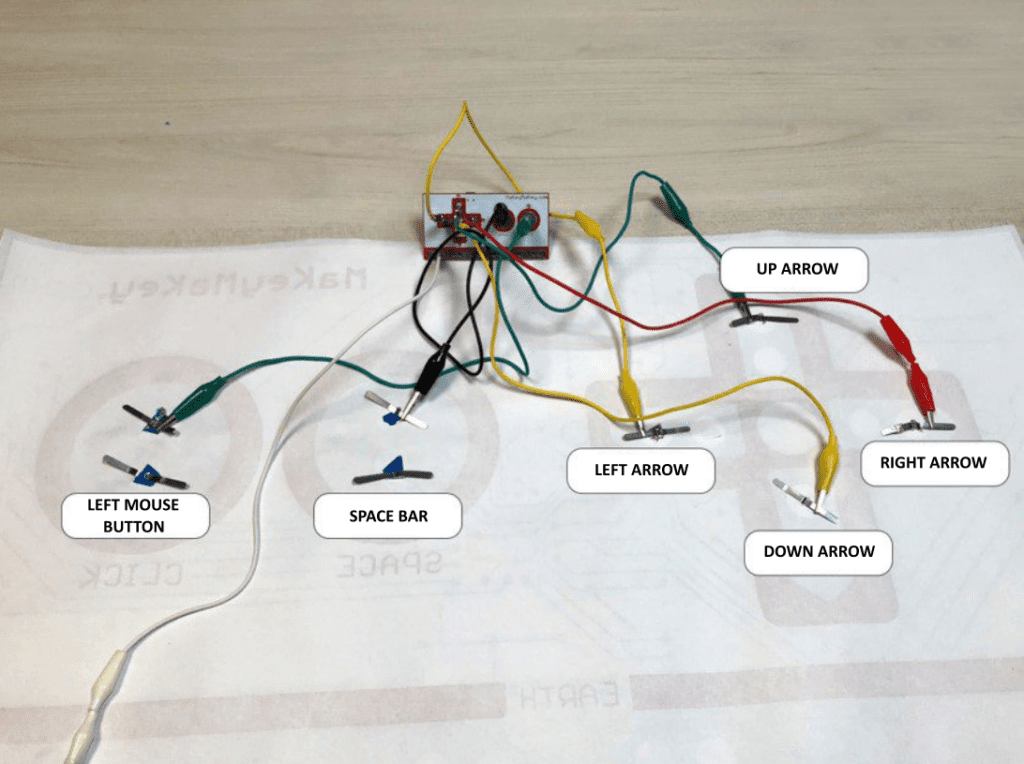
The board is shaped like a video game controller. On the front, there are contact points for the functions of directional arrows (left, right, up, and down), space bar, and mouse click.
It is important to know that there is a lower bar called Earth, which performs the function of a grounding wire, meaning it directs the electrical current from devices to the ground.
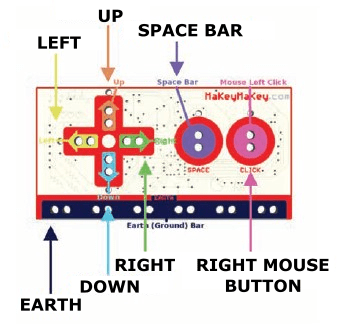
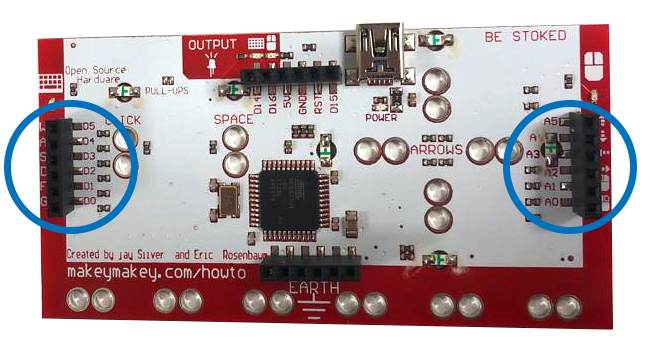
On the back of the board, there are jumpers (connectors) to be used as other keys (W, S, A, D, F, G) of a common keyboard, as well as connections to control all mouse functions (right/left click).
HOW TO CONNECT THE BOARD
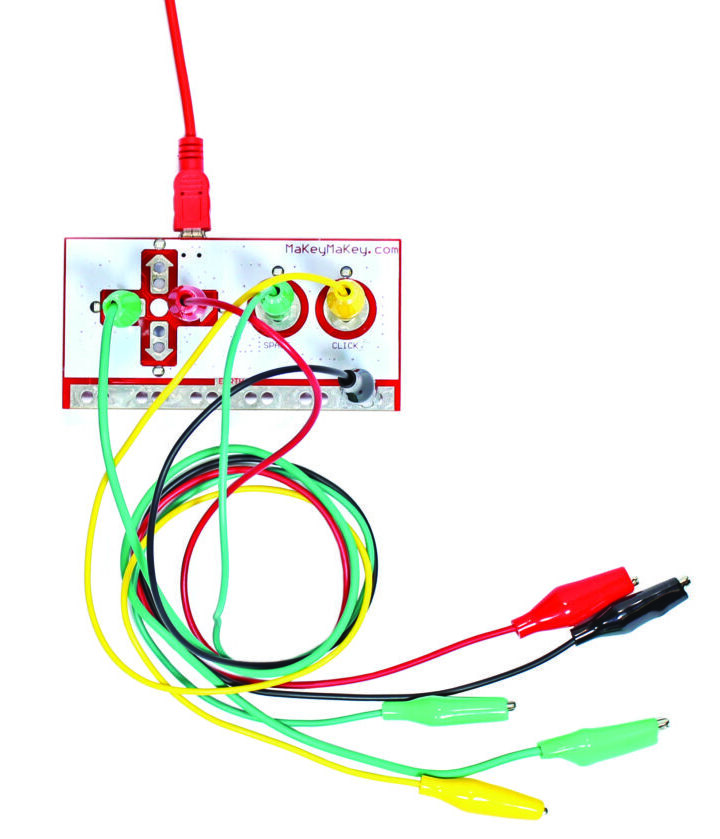 Connect the USB cable to the computer and attach the alligator clips (alligator-type clips) to the contact points on the board and the conductive objects that will be used in the project.
The circuit with objects requires grounding. For this project, grounding will be done by the colleague interacting with the circuit. They should hold the alligator clip connected to the Earth bar with one hand while pressing the object. With that, see what happens!
HOW TO ADD THE MAKEY MAKEY BOARD EXTENSION IN SCRATCH
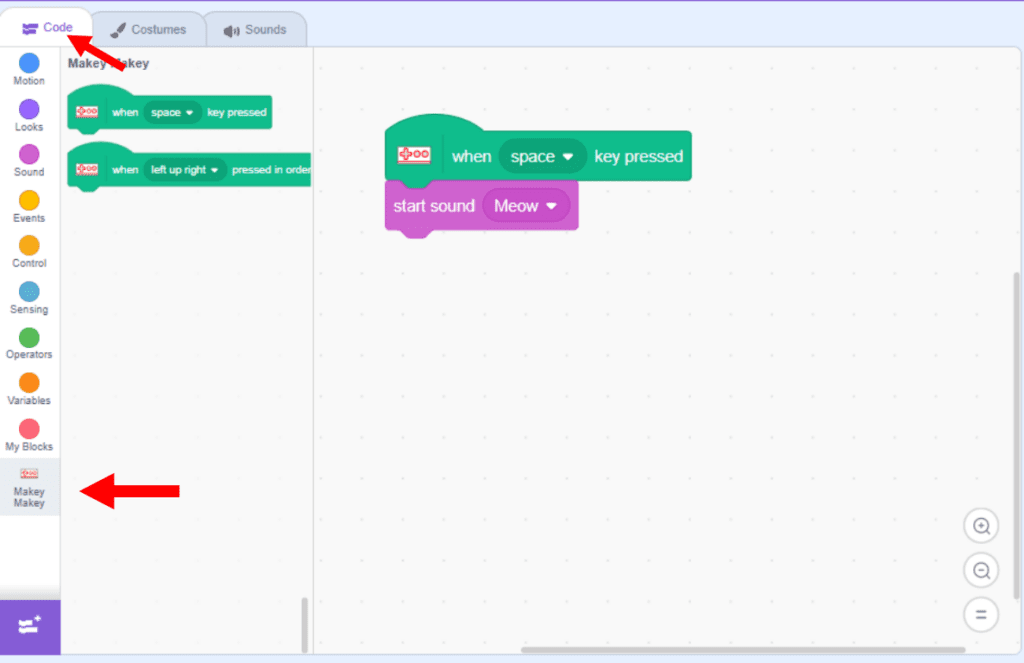 In the “Code” tab, click the “Add Extension” button and then select the Makey Makey option.
Done! The board will be added to the program.
It is also possible to choose the program’s language.
In the Menu Bar, click the icon ![]() and choose the best language option for you.
and choose the best language option for you.
Watch the video and see some project examples:
BUILD
Divide the class into teams of up to five students and distribute the circuit board kit to each one.
Propose to the students to create a giant version of the Makey Makey board, resulting in an interesting model that can be used as a controller for some games. Guide them to follow all the steps in order.
Step 1: gather the materials
• 1 circuit board;
• 1 USB cable;
• printed material (Makey Makey board model);
• black cardboard sheets or cardboard;
• 1 blunt-tip scissors;
• 1 glue;
• pieces of aluminum foil;
• brass fasteners.
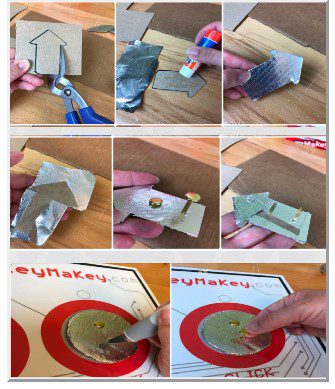
Step 2: print the Makey Makey board layout and glue it onto the cardboard. Then, trace molds of the exact sizes of the arrows and circles from this layout to reproduce them on the cardboard or any other sturdier material.
Step 3: the molds (space and right mouse click) and arrows (right, up, down, left) after being cut out, should be completely covered with aluminum foil.
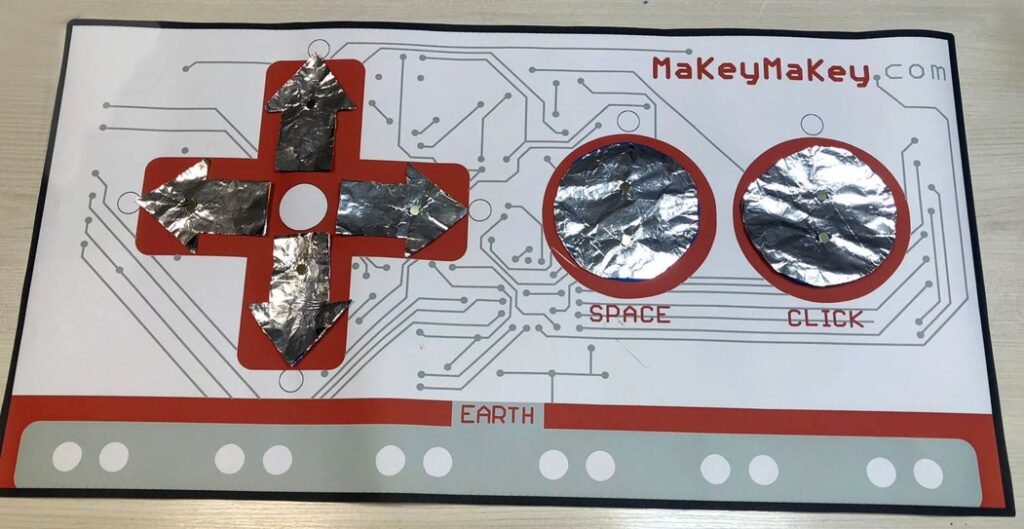
Step 4: the brass fasteners should pierce the circles (2) and arrows (4) from front to back, and then poke through the base of the poster. On the back, the fastener legs should be opened to secure the circles and arrows well to the model.
One end of the alligator clips should be attached to one of the legs of the fasteners, and the other end to the respective buttons on the Makey Makey board. This process should be repeated for all arrows and circles. It is essential that the fasteners make a connection with the sheet (Makey Makey board layout that lines the base of the model) and extend to the back of it. This way, all the previously assembled parts will be conductive.
Step 5: cut a strip of aluminum foil for the Earth Bar and place the fasteners on the left and right to make the connection to the board. 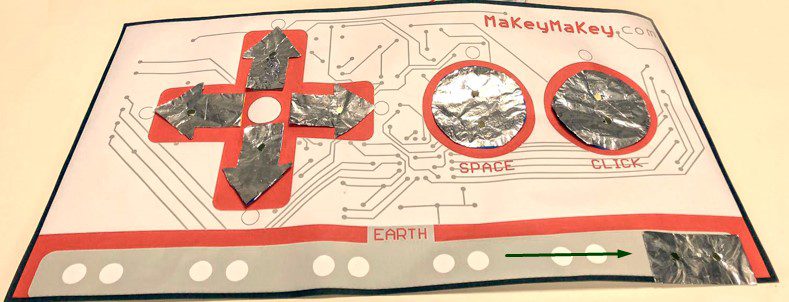
Step 6: to connect the circuit board to the computer, use the USB cable.
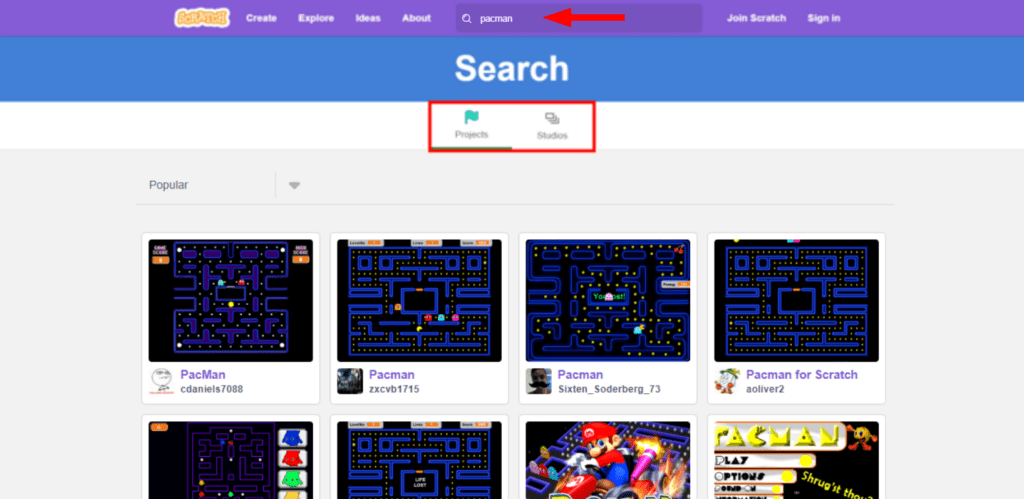
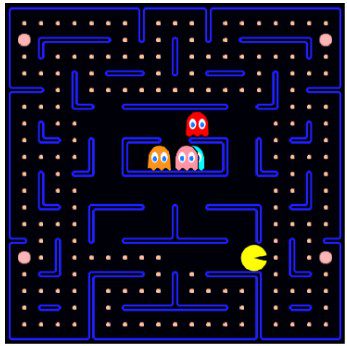
Step 7: run the Scratch program at <https://scratch.mit.edu> and search for the PacMan game.
Step 8: use the giant Makey Makey board as a controller to play PacMan. By clicking the green flag, the game level will load.
CONTINUE
Share the construction results with the class.
• Did the giant controller work with the chosen game?
• Were the alligator clip connections to the circuit board correctly made?
After finishing, all materials must be stored.